
Step by step drawing cars in detail has been shared and taught here. Detail of each step, how to draw cartoon cars, muscle car cartoons and other different type of cars drawing has been shared with the 5 step theory. In this teaching, we will share few more examples together with step by step car drawing picture. This is to show how a car should draw during that particular step and assist beginner feel easier to learn from step 1 to last step. Remember the song? “Step by step, so easy!!” Less talking, let’s begin!
For other good tutorial, click on the link below:
1. Cartoon cars drawn– 9 detail steps, 3 special tips to draw cartoon cars
2. Cartoon drawings of cars– 5 easy steps to draw cartoon cars
3. Cartoon car sketches– Fun and creative sketches
4. How to draw cartoon cars– 5 cute and easy steps to draw cartoon cars
5. Muscle car drawings– 5 coolest steps to draw muscle cars
6. Muscle car cartoons– The drawing art of muscle cars
7. How to draw cars– Some tips on how to draw nice cars
8. Draw simple cars– Some simple technique to draw simple cars
9. Draw cool cars– Drawing nothing but cool cars
10. Cartoon cars clipart– Some fun and cute clipart
11. Pencil drawings car– As simple as some pencil car drawings
12. Cartoon car art– All art of cartoon cars
Tools you need to draw cars
1. Choosing Paper
A piece of clean paper. You can choose A3, A4, or A5. Most of the artists choose A3 as it is easier to draw to a car, but it doesn’t matter as the decision still up to you.
2. Choosing Pencil
There is quite a big range of pencil you can choose to start your beloved car drawn. You can go for the fine line 0.5 to 1.0 graphite pop-a-point pencil (which is non-sharpening pencil). To choose to use hard pencils, you can choose from H, 2H, 3H, all the way up to 9H. The higher number indicates the pencil is harder. To choose soft pencils, the available range is from B, 2B, 3B, all the way up to 9B. The higher number indicates the pencil is softer. Another type of pencil that is the most used pencil in the world and in between H and B pencil is call “HB” which is means Hard Black.
Example 1 – How to draw a Ferrari
Step 1 – Sketches out the frame
If you are about the start the Ferrari drawing, you will have to know the car. Ferrari is sport cars, therefore the length and the height ratio is different with normal car and also different with muscle car drawings. Start the drawing by draw out the lines and circles for the Ferrari with thin lines so that it can be removed easily in the later step. Follow the picture guide and draw 2 circles as the wheel.

Step 2 – Draw the roof and wheel
Here we go to draw the roof, hood, and wheel of the car. Draw some gentle curve line to form the car body. This is an important step as it determines the shape of the car. What shape you draw here, what kind of cars you will get. Make sure you don’t draw like muscle car cartoons if you are drawing a Ferrari. Draw another 2 smaller circle to form the wheel, if you draw a big circle, it will make your drawing look like a pimped out cars.

Step 3 – Let’s fix the door
This step is to draw the sports car door. Since it is a 2D drawing, you will only need to draw 1 door for a 2-door sports car. See more super exotic sports cars to get more idea about how sport cars door should look like. Remove the sketches you draw in step 1, then you can see a clearer picture of the car.

Step 4 – Draw the body line
Here you go to draw the body line. Follow the picture to draw the air flow line. Also, place 2 lines at the car front end and also a small square box on the bonnet. This is almost similar to step 4 in the previous tutorial cartoon drawings of cars.

Step 5 – Complete the car
This step might take a longer time. You will have to draw the sport rims according to the real car, 2 square box at the front end of the car as the pop up head lights, viper, petrol cap, fog lamp, rear signal lamp, side mirror…etc.

Draw cars using grid method
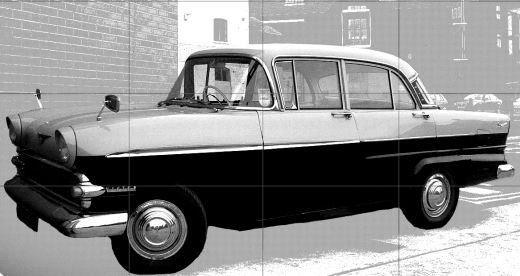
Let’s use a 1950’s Vauxhall Victor classic car as example. The advantage of using this method is it allows you to scale your drawing size to either bigger or smaller. This technique is more advance if you compare to normal pencil drawings but also suitable for anyone to learn.
Step 1 – Create grid to the original picture
The more grids you create, the more detail you can draw by following the grid. Therefore how many grids should be created depends on your own experience.
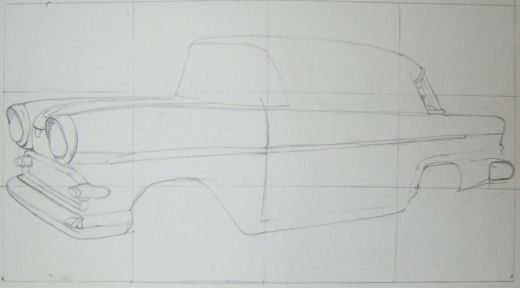
Step 2 – Start the drawing follow the grid
Now is to draw follow the grid. Look at where the lines cross the grid lines and draw the car base on the proportion and do not have to think about the perspective.

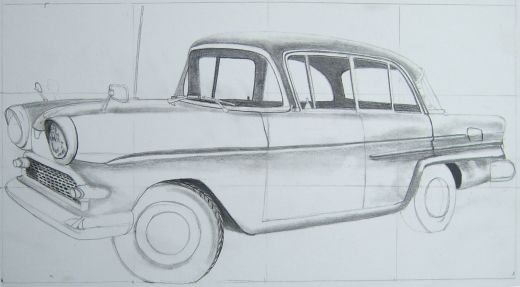
Step 3 – Sketch out more on the car
Now is the time to sketch out more on the car. This step you can choose to use the 2B pencil to darken the roof, wheel, front chrome grill, side mirror which attached to the bonnet…etc a little bit.
Step 4 – Draw shading to complete it
Here is the last step to complete the car by draw out all the shading in place. Make the car look lively in terms of car body, car roof top, front end, head lamps, car accessories, tires…etc
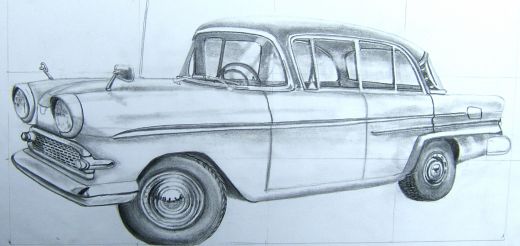
Grid technique is a good technique not only in drawing cars, you can draw anything even the world map once you master the skills. So, have you learnt step by step drawing cars?
Leave a Reply