Category: Car Repair Manual

Download car repair manual for free here based on your car make, model, and model year.

  • Honda Civic Engine Vibrates in Parking Reverse Transmission

    This page is contribute to all Honda Civic FD owners who have engine vibration, roughness, rattle, rumbling sound or other similar situation when the transmission is set to Parking (P) or Reverse (R). Model years affected are 2006, 2007, 2008, 2009, 2010, 2011, 2012, 2013, 2014 and 2015. Read the symptoms properly and see if it is similar to what you have experienced. If so, continue to read on to find out the right solutions and share your thoughts here.

    Symptom 1: One great early morning, you get into your Honda Civic as usual and start the car. The engine vibrates seriously and it sounds like it is going to break into pieces. The vibration happens when you put the transmission in Parking or Reverse. Instead, the vibration goes off when you put the gear in Drive (D), D3, 2, or 1. However, the car does not produce the same vibrations in Reverse or Parking after you have been driving it for a while. In the evening, the car engine doesn’t give you any vibration, rattling sound or rumbling sound.

    Symptom 2: The car engine vibrates when the engine was cold. It sounds like the engine is touching the car body. The engine vibration is gone when the engine is hot or when you speed up. Take a look at the mileage it is exactly 117,000 km (72,700 miles) and the car is 9 years old. This symptom is reported to us by Ashley who invited us to check out her Honda Civic while the mileage has just hit 100,000 km (62,137 miles).

    Honda Civic Engine Vibration Solution

    Well, the engine vibration may sound very scary to the owner of the car not knowing what happen. Do not panic because this is a common problem for most 8th generation Honda Civic owners. It happens when the engine idling or the transmission is in reverse. Here’s a little homework that you can do to your Honda Civic.

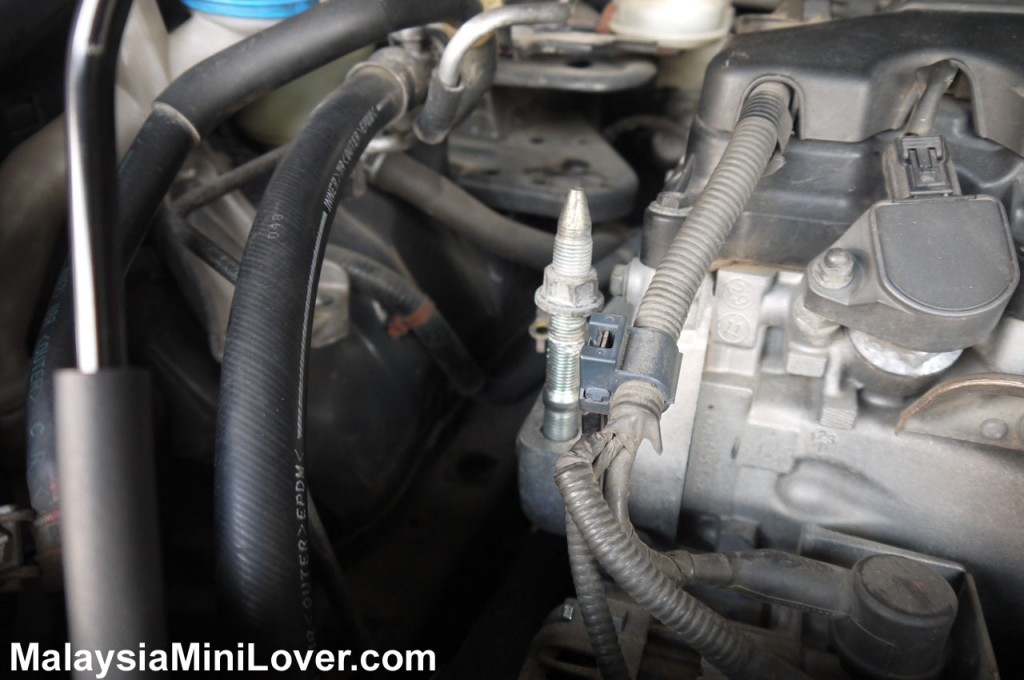
    Step 1: First, open your car hood and locate the right side motor mount as shown in the image here.

    Honda civic engine

    Step 2: Once you have located the right side motor mount. Squat down a little bit and check on the spacing between the bump stops. The spacing between the bump stops should be approximately 1 cm for a good motor mount. Check and see if the bump stops hit on each other. If that is the case, it is time to replace the motor mount with a new one because the old motor mount transfers the engine vibration to the body.

    Honda civic motor mount

    Step 3: The motor mount (some called it engine mount) part no is 50820-SNL-T01. For beginners, it will take you about an hour to replace the part. Instead, an advance mechanic will only need 30 minutes to replace the right motor mount.

    Honda civic motor mount

    Step 4: This is a photo to compare the old worn motor mount and the new one. The motor is hydraulic and it obviously has a lifetime. Take a look at the photo below, the old one is obviously worn out and look old. The new one is showing an approximate 1 cm between the bump stops.

    Honda civic motor mount

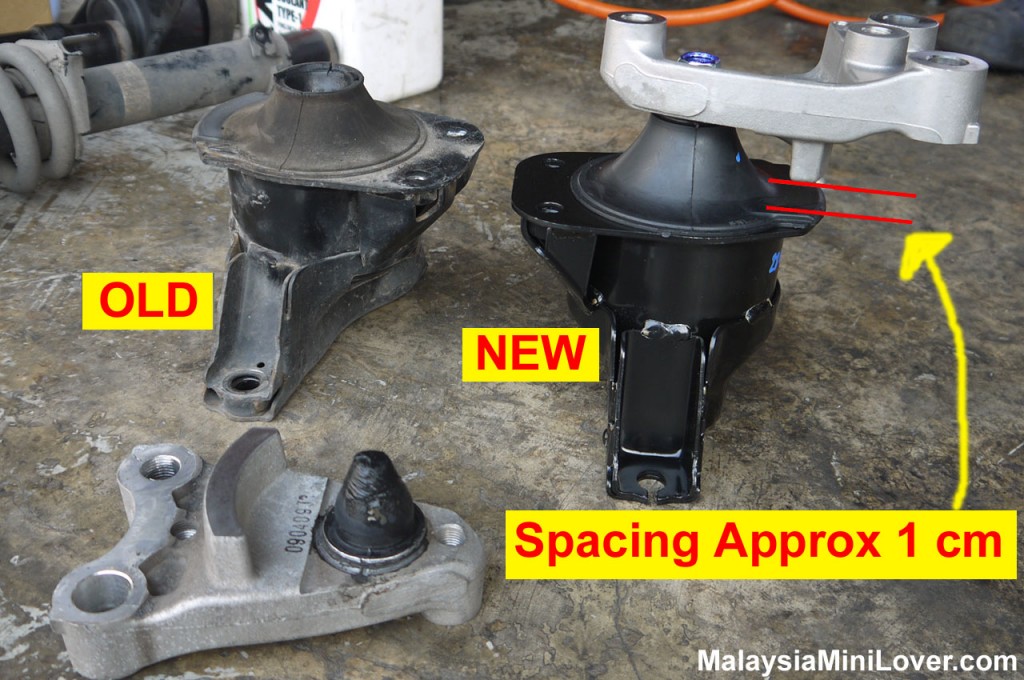
    Step 5: Once a new motor mount or engine mount is replaced, it should look like this. A new motor mount is cost THB3,419 from Honda Thailand and it should cost in between $100 and $150 in United States.

    Honda civic new motor mount

    Some other useful information for Honda Civic FD owner: Honda Civic Fuse Diagram and Basic car maintenance schedule (car maintenance schedule).

    At most of the time, this issue does not relate to bad spark plugs. Does the information shared here solve your problems? Please contact us and let us know if your problem could not be solved after the motor mount is replaced with a new one.

  • Rover Mini SPi Engine Misfire and Fuel Problem

    For those who are driving a Rover Mini Cooper, Rover Mini Mayfair, or any Mini made between 1992 to 1997 (MK VI and early MK VII) with SPi engine, you should read this article if you are having problem with the SPi engine. There are many possibilities with the SPi and MPi engine and that leads to frustration and most Mini owners replace the injection with carburetor system. It is not really hard to maintain a SPi engine if you have the right mechanic and knowledge. Below here is an experience shared by a Mini lover and it should be very useful to all our readers who own a Mini.

    First of all, SPi means Single Point Injection whereby there is one single jet that feeds all four cylinders. It is basically an electronic carburetor. The last generation of classic Mini built from mid 1997 to 2000 comes with MPi which is Multipoint Injection that has its own feed for each cylinder. See a 1998 Rover Mini Mayfair that runs on MPi engine.

    Rover Mini Engine Misfire

    It was a sunny day and I was on a Mini touring trip traveling from Kuala Lumpur to Penang. As usual, I fill the maximum fuel in the tank before the journey started. Well, the Mini that runs on SPi engine is really fun to drive and I couldn’t stop myself from driving the car up to 150 km/h (approx 93 mph). The entire journey is 300 km and my Mini was running good until I have traveled 280 km. I feel the engine misfiring and it feels like the fuel is lost even my right foot is stepped on the accelerator. I immediately stopped at a layby and have a quick check on the engine bay, management relay, all the fuses, and plugs. Everything looks good and the car is able to start like normal. Thus, I try to drive it again.

    The car runs again but the symptoms keep coming. It feels like the fuel is gone for a second and then back again. I was forced to drive in this condition to the nearest mechanic and have him check the car for me. This is the symptom when I try to start the car and give it a hard sudden rev.

    This is the list of what my mechanic replaced for me:

    1. Fuel Pump – My mechanic checked and sees the motor is running and he said it is working.
    2. Fuel filter – It has to be replaced once awhile because the debris reduces the fuel that can flow. The fuel pump is unable to provide enough volume to the injectors if the filter restricts too much fuel. Inadequate fuel volume will reduce power and may cause the engine misfire, hesitate, and stall.
    3. Spark Plug
    4. Spark Plug Wires (Spark Plug Cables)
    5. Ignition Coil
    6. Lambda (Oxygen) Sensor
    7. Fuel Trap
    8. All the vacuum pipe – The black (with green label) one from ECU to Fuel Trap; The black (with white label) one from Inlet Manifold to Fuel Trap; The red one from Throttle Body to Spi Air Box; The yellow one from Air Box Underside to Air Box Upperside hot air temperature control valve.

    It has cost me a fortune to replace all the above-mentioned parts but the problem is still exists. Therefore, I asked for help from some of the experienced Mini drivers, owners, mechanic, and friends from MOGM (Mini Owners Group Malaysia). These are some of the suggestion I get.

    Sam Daud: It could be the fuel pump or the fuel filter or the relay at the brake servo. Just give these a check.

    Mini SPi engine relay
    Relay – Mini SPi Engine Bay

    This is the relay which located near to the brake servo. Sam says it controls the fuel. He also mentioned that the only way to check this is to loan a workable unit and replace the old one.

    Sam Daud: How’s the smoke at the exhaust??

    Sam Daud: May be the fuel injector is blocked.

    Mini SPi engine bay
    Mini SPi Engine Bay

    The injector is located at number 14 in the image above. You will need to use L length key to open it up then you will see the injector (BOSCH brand in green color). There will be two pin, one is positive (+ve) and another is negative (-ve). Remember the position of both pins. The easiest way is to take a photo so that you will know how to put it back. Use a long nose plier with a clean rag to pull it out. Make sure you do it carefully as the injector is a fragile item. Use a carburetor or injection cleaner to spray the area around. You can also use an air gun to blow the injector but please make sure you use a minimum power otherwise you will spoil the injector. Restore everything once it is clean.

    Well, the problem is still exists after all the above work is done. The symptoms? As shown in the video, the RPM goes up until 2500-3000 then the fuel lost. Sometimes it goes up to 4000 then fuel lost again. It is uncertain especially when I try to drive the car. Here comes another suggestion from Abang Rare where he mentioned that the temperature pressure compensator SPI TPC could be faulty. It is located under the throttle body. Here is the image of it.

    temperature pressure compensator
    Temperature Pressure Compensator for SPi engine

    It is a very small round disc that compensates pressure temperature on throttle body on Spi and MPi engine. It costs nearly a 100 GBP and I decide to check on some other thing before checking on this item. However, the temperature pressure compensator can be tested using a multimeter. Nobody is going to replace it before they confirm it is 100% faulty. The members from MOGM are really warm, another member suggested me to check on the wires at the bulkhead behind the air filter. There are a lot of fuses and wires and it takes nearly an hour for my mechanic to check on that.

    temperature pressure compensator

    See also: 1999 Mini 40th Anniversary

    The Real Problem

    The problem is still exists after so many things have been done to the car. My mechanic took out the fuel pump and check on it again. The motor runs and it works normal. However, he noticed that the rubber seal (circle in red) is loosened.

    Mini Fuel Pump SPi injection

    This explained everything. My mechanic fill up the fuel tank over the green line and the symptom is gone. The problem exists when the fuel level below the red line because the fuel leak from it even though the fuel pump push the fuel up. This causes the engine misfire, hesitate, bad idling, and stall. The solution? Replace a new fuel pump that cost approximately 120 GBP or you can modify it with other powerful fuel pump such as the one taken from Nissan Skyline.

    Modified Mini Cooper fuel pump
    A modified Mini SPi fuel pump using one from Honda

    See also: My Mini engine won’t start

    Prevention and SPi Engine Maintenance

    I’ve left my Mini for four years. I only start it three times in a year although the fuel pump is relatively new. Always keep your fuel level at half or above all the time to keep the fuel pump in good condition.

    Last but not least, if you have experienced any problems related to your Mini or other cars and would like to share it here, please do not hesitate to write the story to us at malaysiaminilover [at] gmail.com or you may use the Contact Us feature in this website.

  • How to change a thermostat on a Ford Ranger

    Here is the complete step by step guide on how to change a thermostat on a Ford Ranger. The job can be done easily within half an hour for a professional. Ford Ranger’s engine bay is not complicated and it will take about an hour for someone who needs to read this in order to start the work. Before you start these steps, make sure you have parked the car for at least 30 minutes to let the engine cool down.

    Step 1 Locate where is the thermostat

    There are two hoses attached to the radiator. One is for coolant to flow out from engine to the radiator and another one is for coolant to flow from radiator into engine. The thermostat sits in between the engine and the radiator and it usually connects to the radiator hose where coolant will travel out from radiator to the engine. The reason why it sits there is because it block the coolant from going into the engine when the engine is cold. This is to warm up the engine as soon as possible. Follow the top hose from the radiator and you will find out where the thermostat is. There will be thermostat housing with three nuts so you will not be able to see it even you know how thermostat looks like. This is a picture of the location of a thermostat in a Ford Ranger.

    Thermostat housing in Ford Ranger
    (Image from Ford40.com)

    Step 2 Drain the coolant

    Once you have located the thermostat housing, you can disconnect the coolant temperature sensor connector and then drain the coolant by removing the radiator drain plug. Prepare a pain to keep the coolant. Now you can remove the three bolts around the thermostat housing.

    Step 3 Remove the thermostat

    The thermostat can be seen obviously once the housing is removed. The picture below here show how it sits in between the engine and radiator. You can use a wrench or pliers to remove the thermostat. It may be tight but you can twist a little bit to get it out. If the thermostat has never been changed for a long time, the gasket may wear out and it will stick within the housing and engine. Use clean rag and cleaner to clean it up.

    thermostat in Ford Ranger

    Step 4 Replace a new thermostat

    Make sure you buy a correct thermostat base on your Ford Ranger model year. The best way is to bring the old one to spare parts shop and get the same one. The direction of the thermostat to go in is very important, wrong side will make the car overheat. The best way to know which way the thermostat go is to remember it when you take it out. Keep in mind that the spring side is always towards to the engine just in case if you forget it. For Ford Ranger, the spring side will face just in front of you if you are standing in front of the car. To install a car thermostat, use wrench to mount it in. Below here is a thermostat diagram in a car engine for more understanding.

    Ford Ranger thermostat diagram

    Label 3 is the thermostat, label 4 is the gasket, and you can obviously see the housing in the diagram.

    Step 5 Restore everything

    Now place the thermostat housing and fix the three bolts. Remember to reinstall the drain plug and put in a new coolant if it is dirty. Otherwise you can use the old coolant. Now open the radiator cap, start the engine and observe if the coolant is “moving” after the engine warms up. If it is moving means the new thermostat is working properly.

    Tips for changing a thermostat

    • To speed up the process, you can drain the coolant until the level is just below the thermostat.
    • A thermostat in a car engine seldom wears out. The symptom of a thermostat wear out is the car experience overheating. This is because the thermostat valve did not open to let the coolant flow into the engine when the engine is hot.
    • For more information, see how do I fix my car thermostat, Ford Ranger repair manual.
  • Club Car Service Manual

    Here you can download club car service manual in PDF version for free based on your club car model, model year, or the vehicle serial number. You can find a wide range of service manual here from gasoline-powered club car to the latest electric-powered club car. Many people have the same thoughts that club car is refer to golf cars. However, this is a wrong thought. Club car can be golf cars, utility vehicles, small vehicles, or transportation vehicles that used to move people, materials, tools, or any things in a more efficient way, as well as more fun way. (more…)

  • Where is the fuel filter located?

    Where is the fuel filter located on my car? Here is the answer for some cars with pictures tell you where it is located and steps on changing a fuel filter. Usually the fastest and easiest way to locate a fuel filter on your car is refer to the user manual or the car repair manual. However, it is often that a lot of car owner do not know where they put their user manual after some time. (more…)