Category: Car Problems

All kind of headache car problems and the best solutions.

  • Honda Civic Air Conditioning Problems, Symptoms and Solutions

    I am writing this article to share the experience I had with my 2006 Honda Civic air conditioning problems. I sorted the root problem based on every symptoms the car gives and hunt for the best solutions. Honda Civic owners who face different kind of air conditioning problems should go through this article. I strongly believe that this article could save you hundreds of unwanted repair cost from untruthful dealers or mechanic.

    Last week, I was driving my Honda Civic from Northern Thailand to Southern Thailand, out of sudden, the car AC stops working. It blows only hot air. I parked the car and had a glass of coffee. The AC works again when I start the car. However, it blows hot air again after 1-2 minutes of cold air. This is definitely a weird symptoms to me. As a person who knows nothing about car, the only thing I can do is drive it to the nearest AC workshop. The mechanic, Chang, opened the car hood and did some checking with the gauges on his hand. He told me the air-cond gas is still full but the AC compressor is gone. The approximate price is $1,200 include labour charge. This sounds ridiculous to me because I remember I had just replace the compressor clutch and refill the gas a year ago. I decided to leave with it and go to another shop.

    Here comes another mechanic, Shyne, Shyne was a good man and he told me the AC compressor clutch works for 1-2 minutes then stop working. The compressor clutch is the metal plate attached to the compressor as shown in the image below. When you switch on the AC, it should be running/spinning.

    Honda Civic compressor clutch

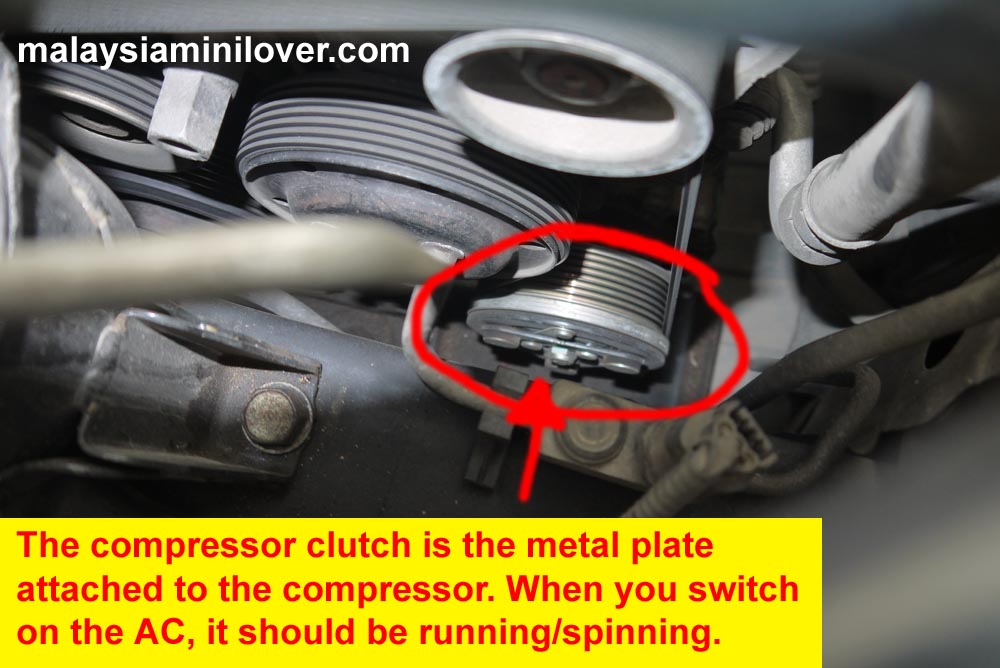
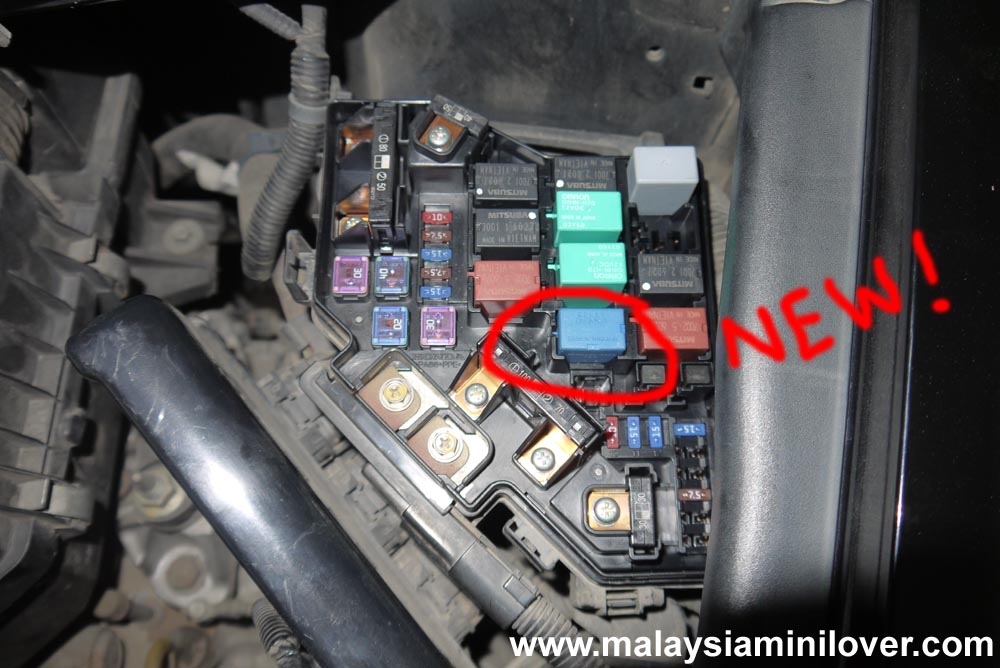
    In my case, it spins for a few minutes then stop working. It works again after a few minutes then stop working, again and again. After a 5-minute checking, Shyne told me the AC compressor, condenser and other parts are working fine. He told me that it was the AC compressor relay that giving the problem. The AC compressor relay is located at top right under the car hood. Please refer to the image below.

    Honda Civic compressor relay and fuse box

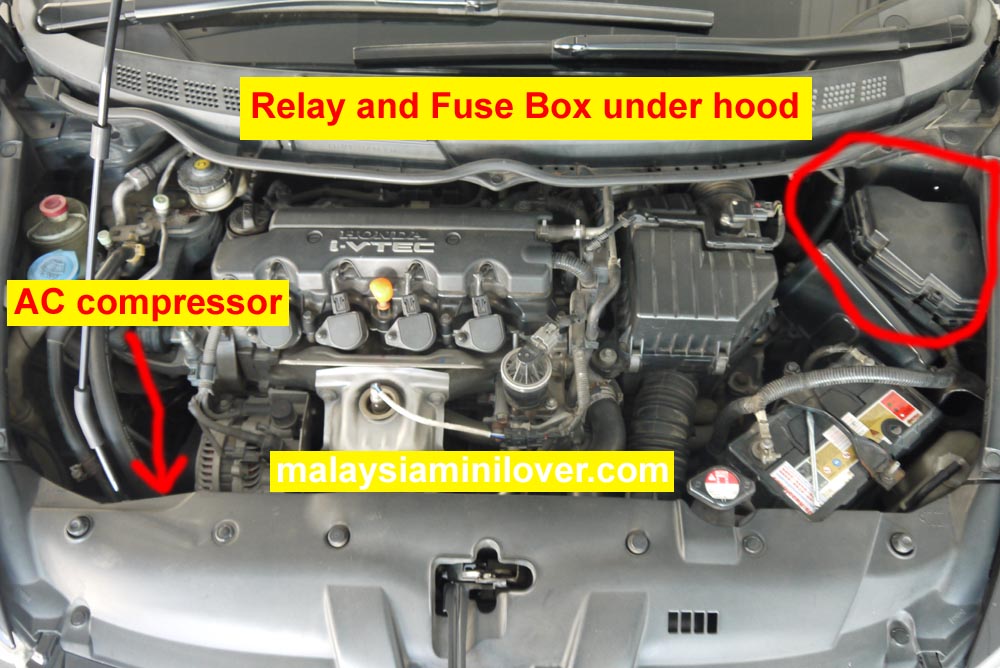
    Once you opened it, you will see a few relay and fuses (see also Honda Civic Fuse Diagram). The AC compressor relay is the one circle in red in the image below. The original relay from Honda is MITSUBA brand, made in VIETNAM. In order to test if it is the relay that cause the problem, you can always switch other relay (similar readings) to the one circle in red. Once switched, you will know if it is the problem. Bingo! It is!

    Honda Civic compressor relay

    In Thailand, there are options to go for Omron or Denso relay. Personally I am more to Denso therefore I bought a brand new DENSO relay at only 100 baht ($3 dollars). It is made in Thailand and that could be the reason why it is cheap.

    Honda Civic compressor relay original and denso

    A special tool is needed to remove the AC compressor relay. However, you can use a flat screwdriver to remove it. Make sure you remove it gently.

    Honda Civic compressor relay

    This is how my under hood fuse box look like with the new DENSO AC compressor relay (the one in blue). Now my Honda Civic air conditioning is working again and all I spent is just $3 instead of $1,200. Always check your relay, fuses and wiring related parts if your AC is not working. Do not simply believe untruthful mechanic because Honda Civic air conditioning compressor is something could last for at least 6-12 years (or 150,000-180,000 km).

    Honda Civic compressor relay

    See also: Honda Civic Engine Vibrates in Parking Reverse Transmission, 2007 Honda Civic Fuse Diagram and Honda Civic: It still smells new after runs for one hundred thousand km in five years.

    This article is written and submitted by Somchai Songsakul, from Thailand. Please use the Write For Us page if you would like to submit an article to MalaysiaMiniLover.com.

  • Honda Civic Engine Vibrates in Parking Reverse Transmission

    This page is contribute to all Honda Civic FD owners who have engine vibration, roughness, rattle, rumbling sound or other similar situation when the transmission is set to Parking (P) or Reverse (R). Model years affected are 2006, 2007, 2008, 2009, 2010, 2011, 2012, 2013, 2014 and 2015. Read the symptoms properly and see if it is similar to what you have experienced. If so, continue to read on to find out the right solutions and share your thoughts here.

    Symptom 1: One great early morning, you get into your Honda Civic as usual and start the car. The engine vibrates seriously and it sounds like it is going to break into pieces. The vibration happens when you put the transmission in Parking or Reverse. Instead, the vibration goes off when you put the gear in Drive (D), D3, 2, or 1. However, the car does not produce the same vibrations in Reverse or Parking after you have been driving it for a while. In the evening, the car engine doesn’t give you any vibration, rattling sound or rumbling sound.

    Symptom 2: The car engine vibrates when the engine was cold. It sounds like the engine is touching the car body. The engine vibration is gone when the engine is hot or when you speed up. Take a look at the mileage it is exactly 117,000 km (72,700 miles) and the car is 9 years old. This symptom is reported to us by Ashley who invited us to check out her Honda Civic while the mileage has just hit 100,000 km (62,137 miles).

    Honda Civic Engine Vibration Solution

    Well, the engine vibration may sound very scary to the owner of the car not knowing what happen. Do not panic because this is a common problem for most 8th generation Honda Civic owners. It happens when the engine idling or the transmission is in reverse. Here’s a little homework that you can do to your Honda Civic.

    Step 1: First, open your car hood and locate the right side motor mount as shown in the image here.

    Honda civic engine

    Step 2: Once you have located the right side motor mount. Squat down a little bit and check on the spacing between the bump stops. The spacing between the bump stops should be approximately 1 cm for a good motor mount. Check and see if the bump stops hit on each other. If that is the case, it is time to replace the motor mount with a new one because the old motor mount transfers the engine vibration to the body.

    Honda civic motor mount

    Step 3: The motor mount (some called it engine mount) part no is 50820-SNL-T01. For beginners, it will take you about an hour to replace the part. Instead, an advance mechanic will only need 30 minutes to replace the right motor mount.

    Honda civic motor mount

    Step 4: This is a photo to compare the old worn motor mount and the new one. The motor is hydraulic and it obviously has a lifetime. Take a look at the photo below, the old one is obviously worn out and look old. The new one is showing an approximate 1 cm between the bump stops.

    Honda civic motor mount

    Step 5: Once a new motor mount or engine mount is replaced, it should look like this. A new motor mount is cost THB3,419 from Honda Thailand and it should cost in between $100 and $150 in United States.

    Honda civic new motor mount

    Some other useful information for Honda Civic FD owner: Honda Civic Fuse Diagram and Basic car maintenance schedule (car maintenance schedule).

    At most of the time, this issue does not relate to bad spark plugs. Does the information shared here solve your problems? Please contact us and let us know if your problem could not be solved after the motor mount is replaced with a new one.

  • Rover Mini SPi Engine Misfire and Fuel Problem

    For those who are driving a Rover Mini Cooper, Rover Mini Mayfair, or any Mini made between 1992 to 1997 (MK VI and early MK VII) with SPi engine, you should read this article if you are having problem with the SPi engine. There are many possibilities with the SPi and MPi engine and that leads to frustration and most Mini owners replace the injection with carburetor system. It is not really hard to maintain a SPi engine if you have the right mechanic and knowledge. Below here is an experience shared by a Mini lover and it should be very useful to all our readers who own a Mini.

    First of all, SPi means Single Point Injection whereby there is one single jet that feeds all four cylinders. It is basically an electronic carburetor. The last generation of classic Mini built from mid 1997 to 2000 comes with MPi which is Multipoint Injection that has its own feed for each cylinder. See a 1998 Rover Mini Mayfair that runs on MPi engine.

    Rover Mini Engine Misfire

    It was a sunny day and I was on a Mini touring trip traveling from Kuala Lumpur to Penang. As usual, I fill the maximum fuel in the tank before the journey started. Well, the Mini that runs on SPi engine is really fun to drive and I couldn’t stop myself from driving the car up to 150 km/h (approx 93 mph). The entire journey is 300 km and my Mini was running good until I have traveled 280 km. I feel the engine misfiring and it feels like the fuel is lost even my right foot is stepped on the accelerator. I immediately stopped at a layby and have a quick check on the engine bay, management relay, all the fuses, and plugs. Everything looks good and the car is able to start like normal. Thus, I try to drive it again.

    The car runs again but the symptoms keep coming. It feels like the fuel is gone for a second and then back again. I was forced to drive in this condition to the nearest mechanic and have him check the car for me. This is the symptom when I try to start the car and give it a hard sudden rev.

    This is the list of what my mechanic replaced for me:

    1. Fuel Pump – My mechanic checked and sees the motor is running and he said it is working.
    2. Fuel filter – It has to be replaced once awhile because the debris reduces the fuel that can flow. The fuel pump is unable to provide enough volume to the injectors if the filter restricts too much fuel. Inadequate fuel volume will reduce power and may cause the engine misfire, hesitate, and stall.
    3. Spark Plug
    4. Spark Plug Wires (Spark Plug Cables)
    5. Ignition Coil
    6. Lambda (Oxygen) Sensor
    7. Fuel Trap
    8. All the vacuum pipe – The black (with green label) one from ECU to Fuel Trap; The black (with white label) one from Inlet Manifold to Fuel Trap; The red one from Throttle Body to Spi Air Box; The yellow one from Air Box Underside to Air Box Upperside hot air temperature control valve.

    It has cost me a fortune to replace all the above-mentioned parts but the problem is still exists. Therefore, I asked for help from some of the experienced Mini drivers, owners, mechanic, and friends from MOGM (Mini Owners Group Malaysia). These are some of the suggestion I get.

    Sam Daud: It could be the fuel pump or the fuel filter or the relay at the brake servo. Just give these a check.

    Mini SPi engine relay
    Relay – Mini SPi Engine Bay

    This is the relay which located near to the brake servo. Sam says it controls the fuel. He also mentioned that the only way to check this is to loan a workable unit and replace the old one.

    Sam Daud: How’s the smoke at the exhaust??

    Sam Daud: May be the fuel injector is blocked.

    Mini SPi engine bay
    Mini SPi Engine Bay

    The injector is located at number 14 in the image above. You will need to use L length key to open it up then you will see the injector (BOSCH brand in green color). There will be two pin, one is positive (+ve) and another is negative (-ve). Remember the position of both pins. The easiest way is to take a photo so that you will know how to put it back. Use a long nose plier with a clean rag to pull it out. Make sure you do it carefully as the injector is a fragile item. Use a carburetor or injection cleaner to spray the area around. You can also use an air gun to blow the injector but please make sure you use a minimum power otherwise you will spoil the injector. Restore everything once it is clean.

    Well, the problem is still exists after all the above work is done. The symptoms? As shown in the video, the RPM goes up until 2500-3000 then the fuel lost. Sometimes it goes up to 4000 then fuel lost again. It is uncertain especially when I try to drive the car. Here comes another suggestion from Abang Rare where he mentioned that the temperature pressure compensator SPI TPC could be faulty. It is located under the throttle body. Here is the image of it.

    temperature pressure compensator
    Temperature Pressure Compensator for SPi engine

    It is a very small round disc that compensates pressure temperature on throttle body on Spi and MPi engine. It costs nearly a 100 GBP and I decide to check on some other thing before checking on this item. However, the temperature pressure compensator can be tested using a multimeter. Nobody is going to replace it before they confirm it is 100% faulty. The members from MOGM are really warm, another member suggested me to check on the wires at the bulkhead behind the air filter. There are a lot of fuses and wires and it takes nearly an hour for my mechanic to check on that.

    temperature pressure compensator

    See also: 1999 Mini 40th Anniversary

    The Real Problem

    The problem is still exists after so many things have been done to the car. My mechanic took out the fuel pump and check on it again. The motor runs and it works normal. However, he noticed that the rubber seal (circle in red) is loosened.

    Mini Fuel Pump SPi injection

    This explained everything. My mechanic fill up the fuel tank over the green line and the symptom is gone. The problem exists when the fuel level below the red line because the fuel leak from it even though the fuel pump push the fuel up. This causes the engine misfire, hesitate, bad idling, and stall. The solution? Replace a new fuel pump that cost approximately 120 GBP or you can modify it with other powerful fuel pump such as the one taken from Nissan Skyline.

    Modified Mini Cooper fuel pump
    A modified Mini SPi fuel pump using one from Honda

    See also: My Mini engine won’t start

    Prevention and SPi Engine Maintenance

    I’ve left my Mini for four years. I only start it three times in a year although the fuel pump is relatively new. Always keep your fuel level at half or above all the time to keep the fuel pump in good condition.

    Last but not least, if you have experienced any problems related to your Mini or other cars and would like to share it here, please do not hesitate to write the story to us at malaysiaminilover [at] gmail.com or you may use the Contact Us feature in this website.

  • My Mini engine won’t start

    fuel injection engine
    It is frustrated when a car engine won’t start especially during the morning you are rushing for your work or going for a date. My 1993 Mini Cooper does give me this headache last week. It is not usual when a car engine won’t start, there must be a reason. I’ve decided to written down my experience and hope I can pass this knowledge to the Mini world.

    My 1993 Mini Cooper is powered by a 1275cc engine paired with fuel injection system. The car was kept in the garage and did not start for about six months. One early morning, I brought the car key and try to start the car. It did not cranks at all, I switch on the lights – it is not working; I press on the horn – there is no sound; I turn on the stereo – there is no music. Obviously, it is the sign of a flat battery. I quickly went to a nearby car accessories shop and get a brand new battery. Now the car cranks and it cranks very strong. The headlights are working, signal lights are working, horn is very loud, and the stereo plays nice music but it still won’t start.

    At least I know the starter is working because it cranks very strong. I went on to diagnose the problem one by one. I pulled out one of the spark plugs and try to test it with any metal place under the hood. There is a strong spark – it means the ignition coil, the distributor, and the spark plugs are working. Generally, the ignition coil turns the battery power to spark and send it to the distributor, which then sends the sparks out to the spark plugs. An engine starts because of the compression, mixture or fuel and spark. So now I move on the check the fuel.

    fuel injection
    Fuel Injection

    Fuel system isn’t really hard to check as long as you know how to do so. The fuel is kept in a fuel tank at the back, a fuel pump will pump the fuel from the tank to the manifold and the car will start. An injection engine has an “In” fuel host as well as “Return” fuel host. I pour a little bit fuel direct into the manifold and the engine starts! However, it starts awhile and then stops again. This is because the amount of fuel I pour in has finished burn. Now the problem is clearly diagnosed, which is the fuel system problem. I use a 17 wrench to open the “In” fuel host and crank the car. There is no fuel deliver from the fuel tank.

    fuel tank
    Fuel tank and the speaker hole

    Now there is only one reason the fuel did not deliver to the manifold, the fuel pump sits inside the fuel tank at the back. I remove the fuel pump socket and use the power from battery to try if it is working. There is no sound and no response from the fuel pump. The fuel pump is the root of the problem.

    fuel pump
    Look! How bad the fuel pump is!

    The correct way to replace a fuel pump in a Mini is to remove the number 13 bolt and take out the entire fuel tank. Without doing this, you can’t take the fuel pump out from the fuel tank. However, I did not do so due to laziness. I removed the speaker on top of the fuel tank, unscrew the six bolts and pull the fuel pump out from the tank through the speaker hole. Thank god the speaker hole is big enough for the pump. It’s tricky but it works and it saved me a lot of time although the correct way to replace a fuel pump is to flush the fuel tank too. Now my car is able to start and it is on the road again with over 150 km/h without any problem! Hope this article helps!

    fuel pump
    Bad fuel pump

  • 5 symptoms of worn automatic transmission

    Here are the 5 symptoms of worn automatic transmission. Some of these car symptoms can be felt, can be seen, and can be hear. All these symptoms tell that the transmission is failing and actions have to be taken. Sometimes it may just car owner did not follow the car maintenance schedule and forget to replace the transmission oil. Read up these top 5 symptoms of worn automatic transmission and you may save the cost to repair the gear box. (more…)